With the OpenCore Legacy Patcher, it's possible to install macOS Sequoia on Mac computers from as far back as 2008. Here's how to get everything set up.
After a series of developer betas, Apple made macOS Sequoia available to the general public. While the update introduced a variety of new features and useful enhancements, macOS Sequoia also dropped support for the 2018 and 2019 MacBook Air.
Although the operating system still supports machines as far back as the 2017 iMac Pro, many older Mac computers can't run the software officially.
This is where a prominent third-party solution, known as OpenCore Legacy Patcher or OCLP, comes into play. Dortania's OpenCore Legacy Patcher makes it possible to run macOS Sequoia on a variety of unsupported Macs, even including models over a decade old.
The patcher makes use of the OpenCore bootloader which can be used to "inject and patch data in memory instead of on disk." According to the patcher's GitHub page, this is why it can achieve near-native levels of performance on officially unsupported hardware.
OpenCore is what's known as a custom bootloader, which is loaded before the main operating system. It's an open-source project, available on acidanthera's GitHub page. At startup, it lets you select between one or more operating systems currently installed.
OpenCore by itself is commonly used in the Hackintosh community, where people install macOS on non-Apple PCs. This guide, however, focuses only on the OpenCore Legacy Patcher, and how to use it to install macOS Sequoia on genuine, unsupported Mac computers. No prior knowledge is necessary, apart from basic familiarity with the macOS operating system.
Before upgrading to macOS Sequoia, it's important to understand which operating systems and Mac models are supported by Dortania's OpenCore Legacy Patcher.
Which versions of macOS can you run with OpenCore Legacy Patcher?
OpenCore Legacy Patcher allows you to install any version from macOS Big Sur to macOS Sequoia on select unsupported machines. For older versions of macOS, we recommend checking out dosdude1's Catalina patcher, or NexPostFacto for even older Mac computers that can't officially run macOS Mavericks.
With OCLP, you'll be able to run release versions of macOS Sequoia on unsupported hardware, this includes developer betas as well as public betas. Running beta versions of macOS is more risky, though, and could cause you to lose your data if something goes wrong.
Which Mac computers are capable of running macOS Sequoia through OCLP?
According to the OpenCore Legacy Patcher GitHub page, the software makes it possible to run macOS Sequoia on the following unsupported Mac computers:
- Late 2008 to 2017 13-inch and 12-inch MacBooks
- Late 2008 to 2017 11-inch and 13-inch MacBook Airs
- Early 2008 to 2017 13-inch, 15-inch and 17-inch MacBook Pros
- Early 2009 to 2014 Mac minis
- Mid 2007* to 2017 20-inch to 27-inch iMacs
- Early 2008 to 2013 Mac Pros
- Early 2009 to 2009 XServe machines
Note that 2007 iMac models require an upgraded CPU for use with OpenCore Legacy Patcher. These machines can be upgraded with either a T9300 2.5 GHz Intel Core 2 Duo or a T9500 2.6 GHz Intel Core 2 Duo.
For Early 2009 through Mid 2011 iMacs, as well as Early 2008 and 2009 Xserve models, an upgrade to a Metal-compatible GPU is recommended for better graphics performance and graphics acceleration. Metal is Apple's GPU-accelerated graphics and compute framework, used throughout more recent versions of macOS.
Pre-2012 Macs generally lack a Metal-compatible GPU by default, but some iMac and XServe machines can be upgraded with newer graphics cards. OCLP still supports non-Metal Macs, though, but users may experience performance issues or Metal-related problems, such as the Photos app failing to work properly.
At the time of writing, 2018 and 2019 MacBook Air models cannot be updated to macOS Sequoia with OpenCore Legacy Patcher, due to an issue with the T2 security chip found in these computers. As a result, these machines currently cannot be upgraded past macOS Sonoma.
Preparing your Mac for macOS Seqouia
Before attempting to install an unsupported version of macOS, it's important to take a few safety precautions and ensure you have the necessary equipment to proceed.
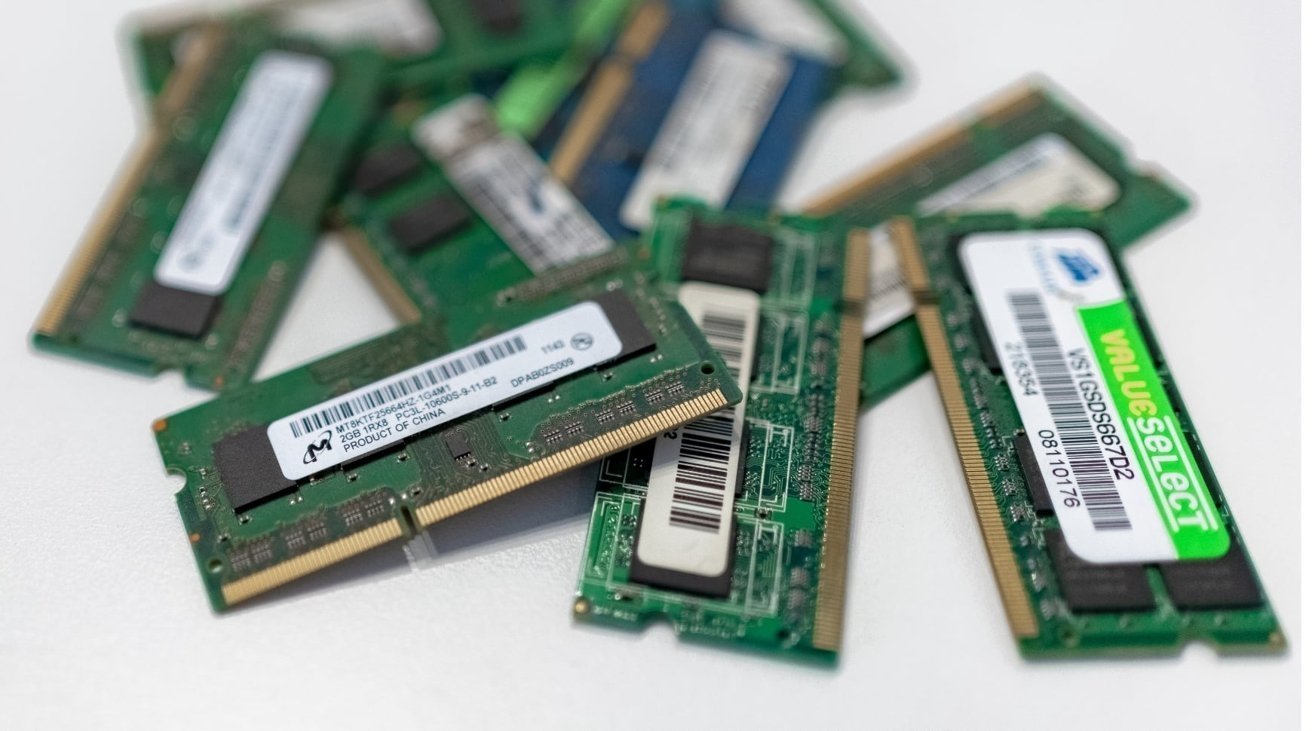
If you want to run macOS Sequoia, upgrading your Mac to at least 8GB of RAM is recommended.
As with every major software update, it is recommended that you make a backup of the most important data stored on your Mac. AppleInsider suggests using a form of portable flash storage media, such as an external solid-state drive (SSD), USB flash drive, or a large enough SD card. Alternatively, you can also use cloud-based backup solutions.
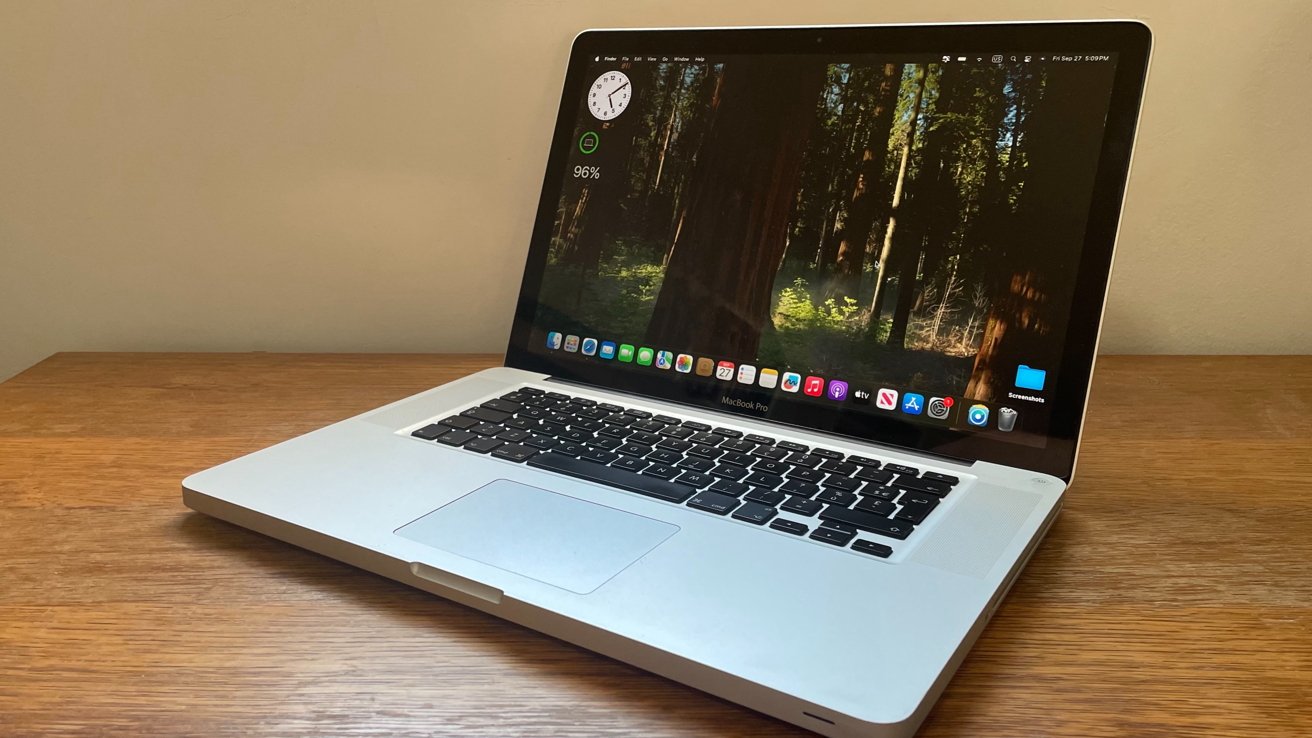
While it may be tempting to try and install macOS Sequoia immediately, it is recommended to first update your Mac to its last officially supported version. For a 2012 unibody MacBook Pro, for instance, this means updating the device to macOS Catalina.
For optimal performance, you'll also want to upgrade your Mac's hardware, if possible. On some older Mac computers, the RAM, storage, CPU, and GPU can be upgraded. Ideally, your Mac should have at least 8GB of RAM and an internal solid-state drive or SSD if you want to run macOS Sequoia.
Once you've backed up your data, updated your Mac to its last officially supported version, and have ensured that your Mac can indeed run macOS Seqoua through OpenCore Legacy Patcher, you're ready to proceed.
For the next step, you will need a 32GB or larger USB flash drive, or an external SSD, as this is required to create a bootable macOS Sequoia installer with OpenCore Legacy Patcher. First, you will need to download the patcher itself.
Downloading and installing OpenCore Legacy Patcher
You can download the OpenCore Legacy Patcher from the releases section of Dortania's official GitHub page. From the page area labeled Assets, select OpenCore-Patcher.pkg, download the file and install it.
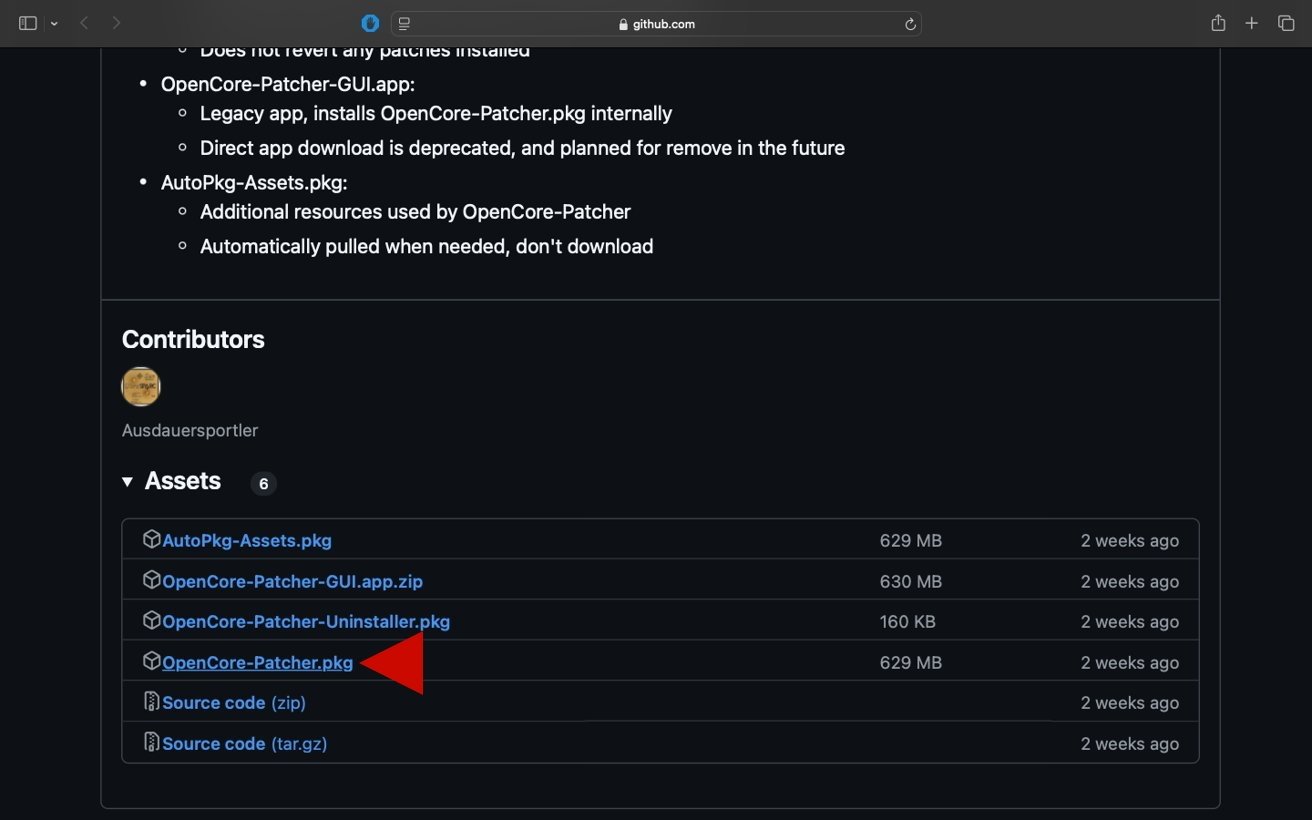
Click on "OpenCore-Patcher.pkg," download and install the package.
After you've downloaded and installed the pkg file, you can find the OCLP app in your applications folder. Now you can plug in the USB flash drive or external SSD which will be used for creating a bootable macOS Sequoia installer.
Creating a bootable macOS install drive with OpenCore Legacy Patcher
OpenCore Legacy Patcher has a built-in option that allows you to create a bootable installer. Clicking the Create macOS Installer button will let you select the macOS version you wish to install.
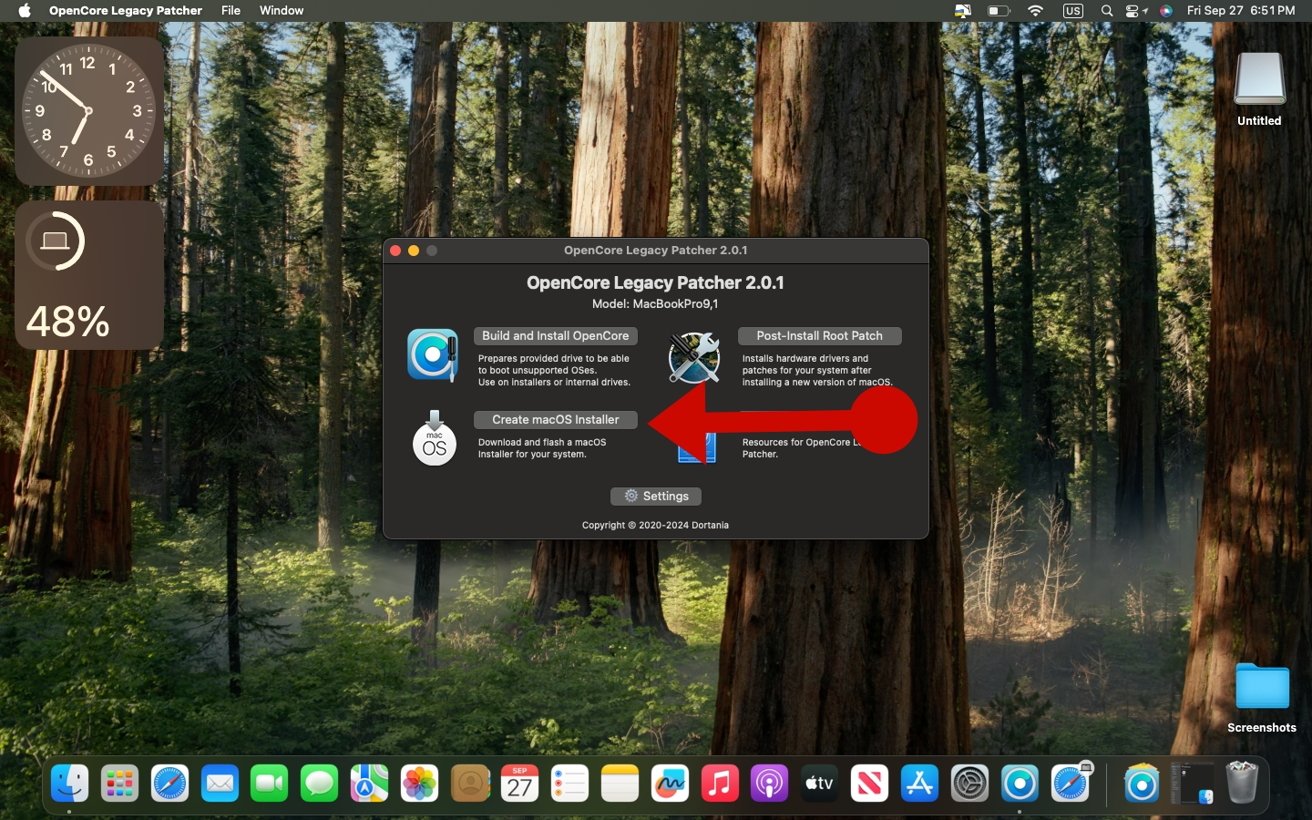
Click on the "Create macOS Installer" option in the OpenCore Legacy Patcher app.
The patcher can download macOS installer apps from the internet, or you can use a macOS Sequoia installer app you already downloaded beforehand. Direct download links for macOS installer packages can be found on Mr. Macintosh's website.
To download a macOS Installer package from the internet, click on Download macOS Installer.
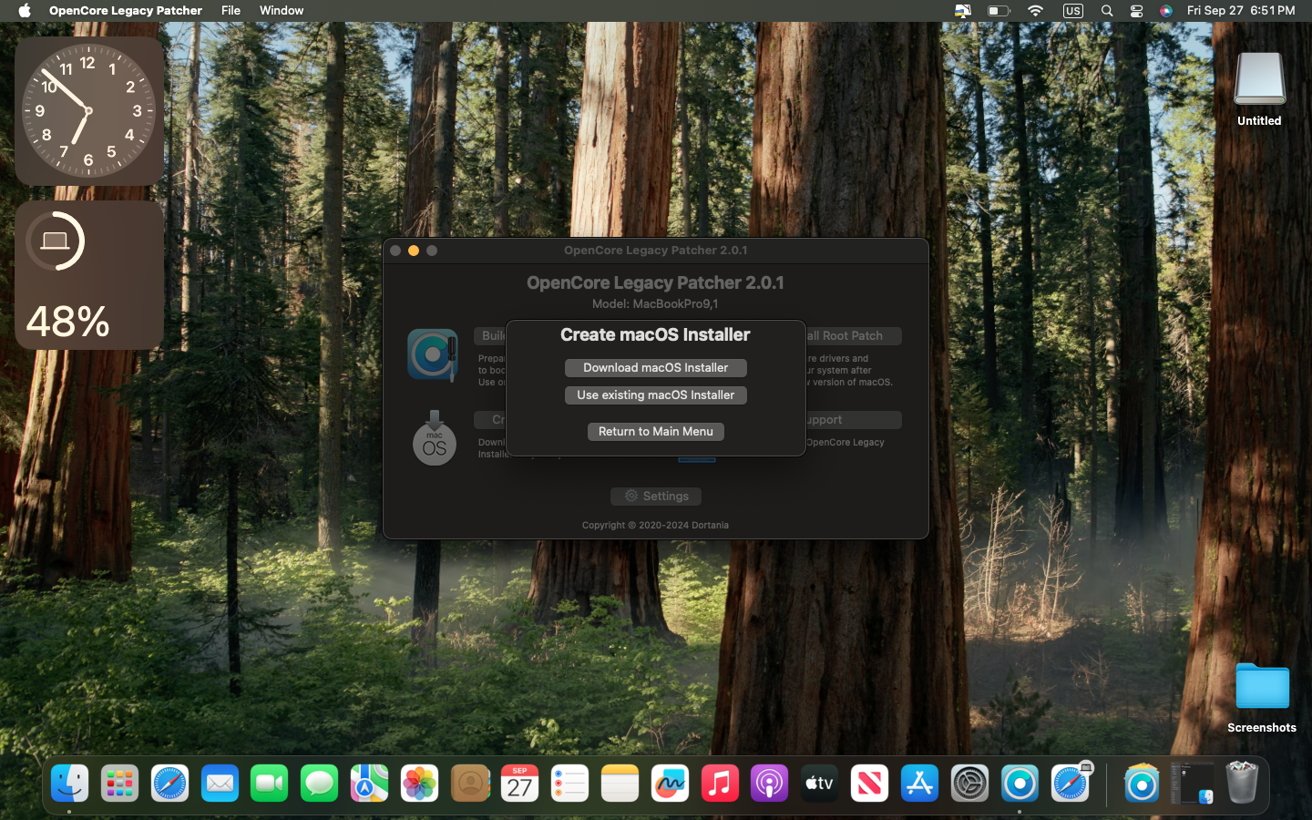
You can choose to download a macOS Installer app from the internet, or use one you downloaded earlier.
The OpenCore Legacy Patcher will now present you with a list of different installers that can be downloaded. Choose macOS Sequoia.
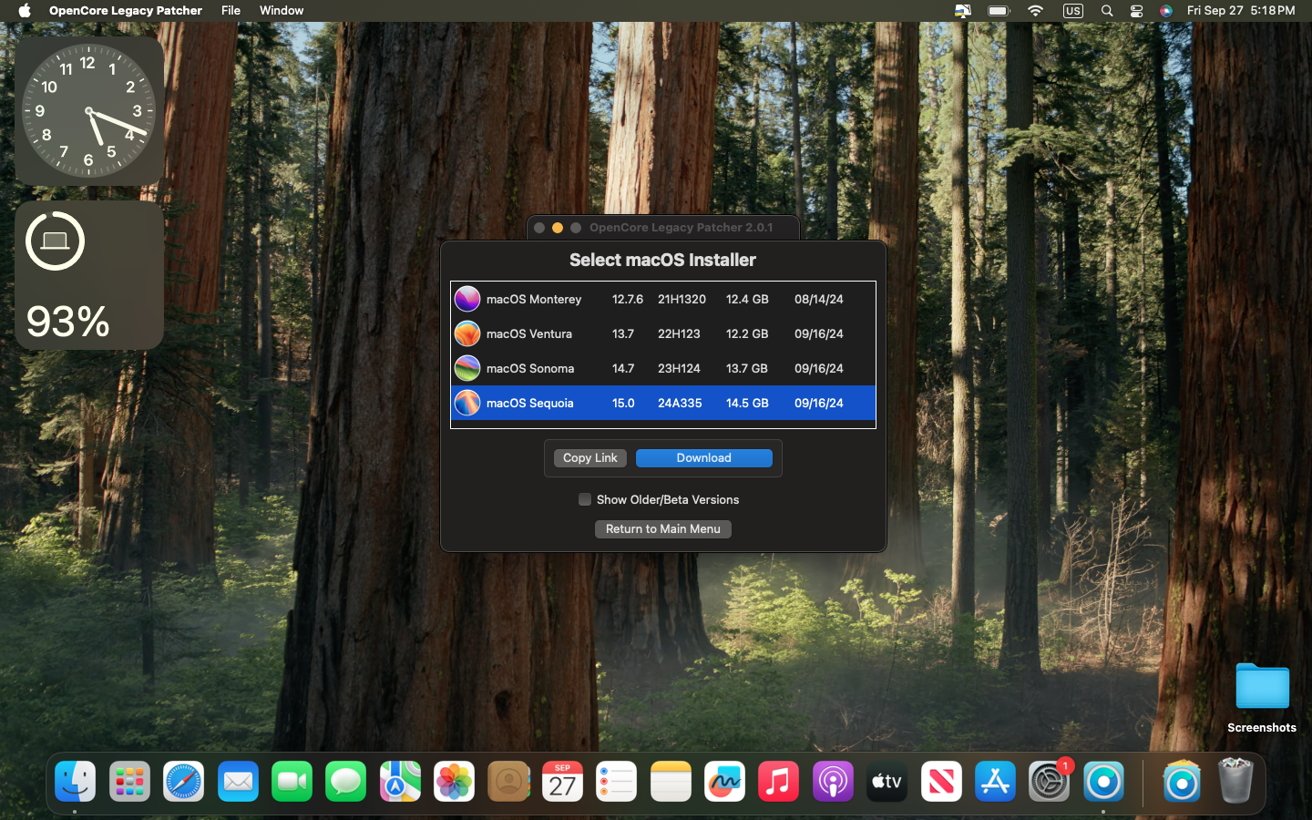
OpenCore Legacy Patcher can download macOS installer packages from the internet.
Once you have downloaded a macOS installer application, you can create a bootable macOS installer drive via the OpenCore Legacy Patcher app.
The OpenCore Legacy Patcher app will ask you to select a local disk. Select the USB drive or external solid-state drive you plugged in earlier.
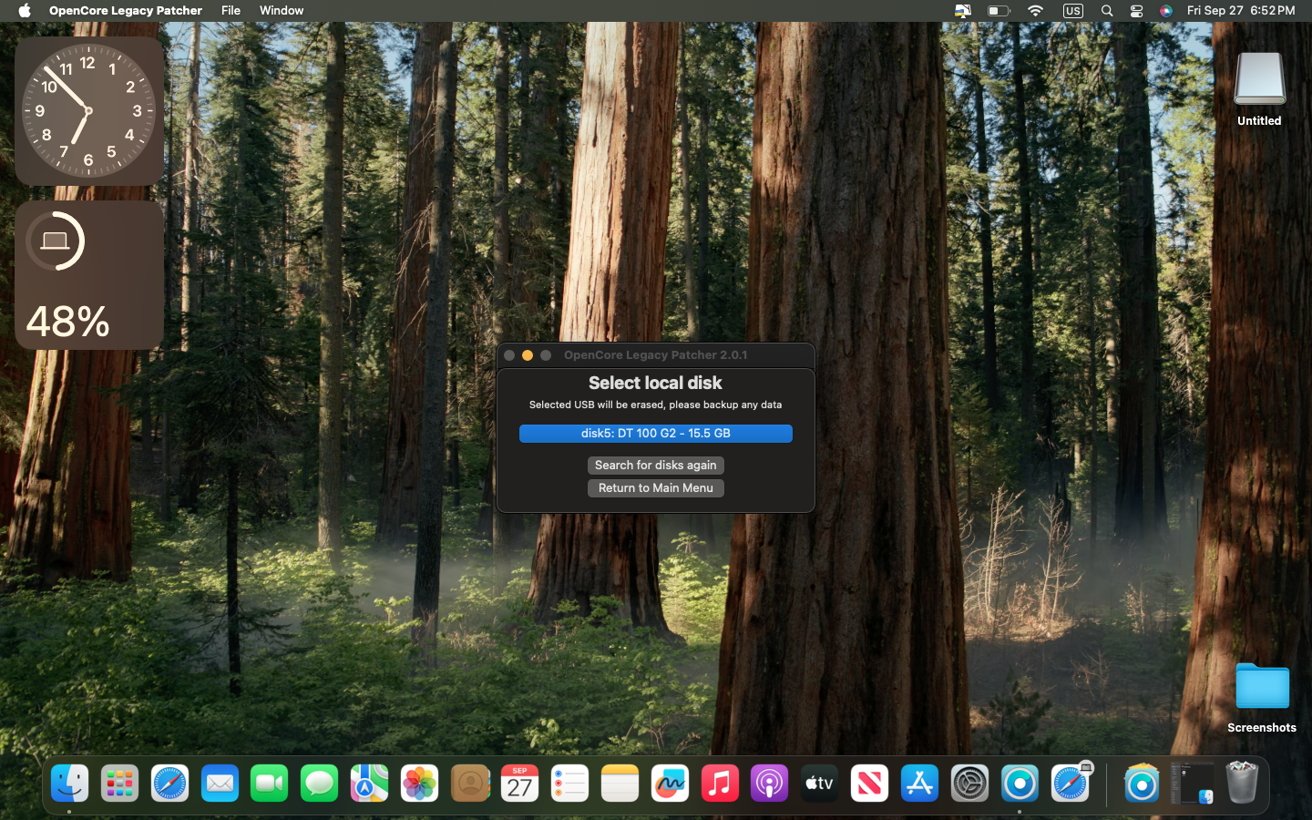
Select the external drive to be used for the bootable macOS Sequoia installer.
The OpenCore Patcher will remind you that all data on this disk will be erased. This is necessary to create the macOS installer, so click on the Yes button.
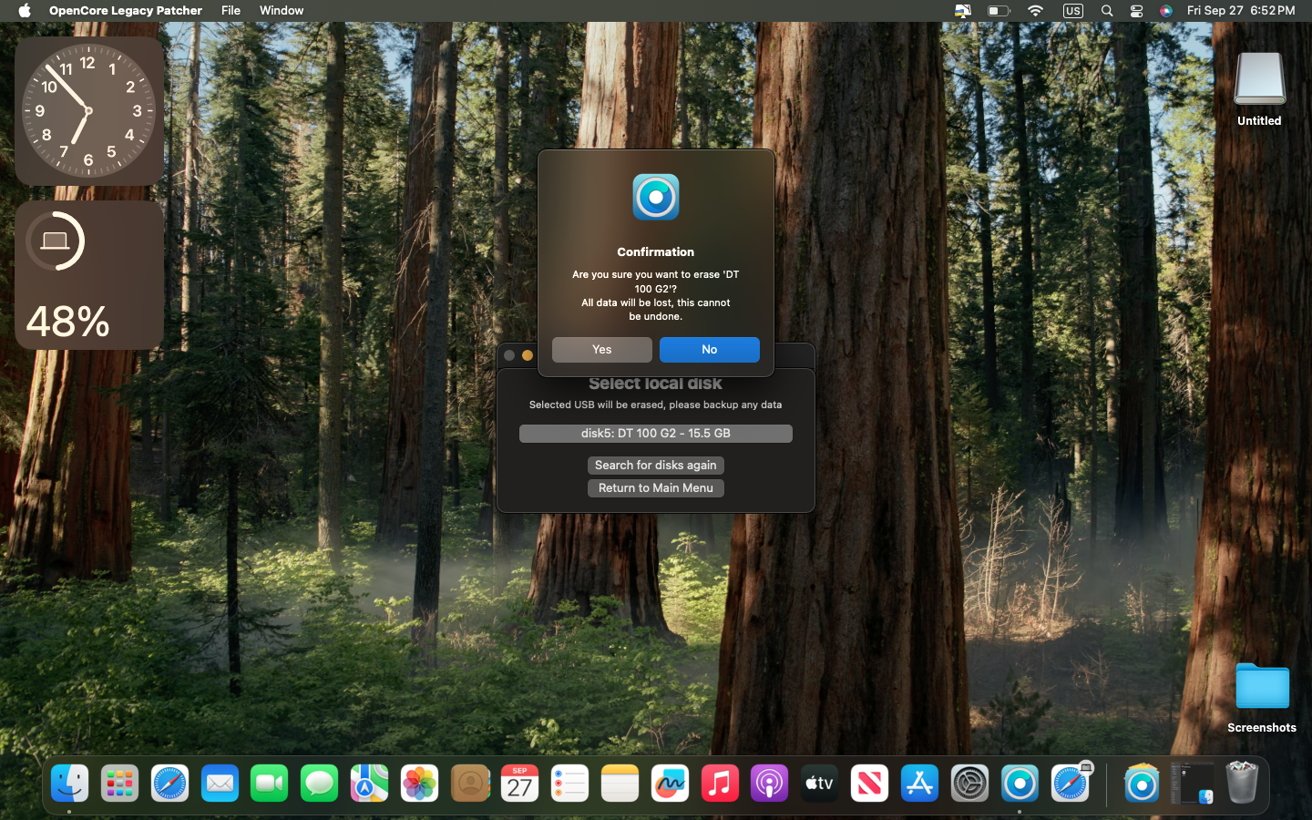
Select "Yes," as you will need to erase the drive to create the bootable macOS installer.
The Patcher application will now start creating a bootable macOS installer. This step will take some time, depending on the speed of your external drive.
After the patcher has created a bootable macOS installer, you will see a prompt asking you if you want to install OpenCore on this drive. You need to click Yes when this prompt shows up, otherwise you won't be able to boot into the installer.
Now the OpenCore patcher will start building the correct OpenCore configuration for your Mac. You will see a popup once this is finished. Click on Install to disk.
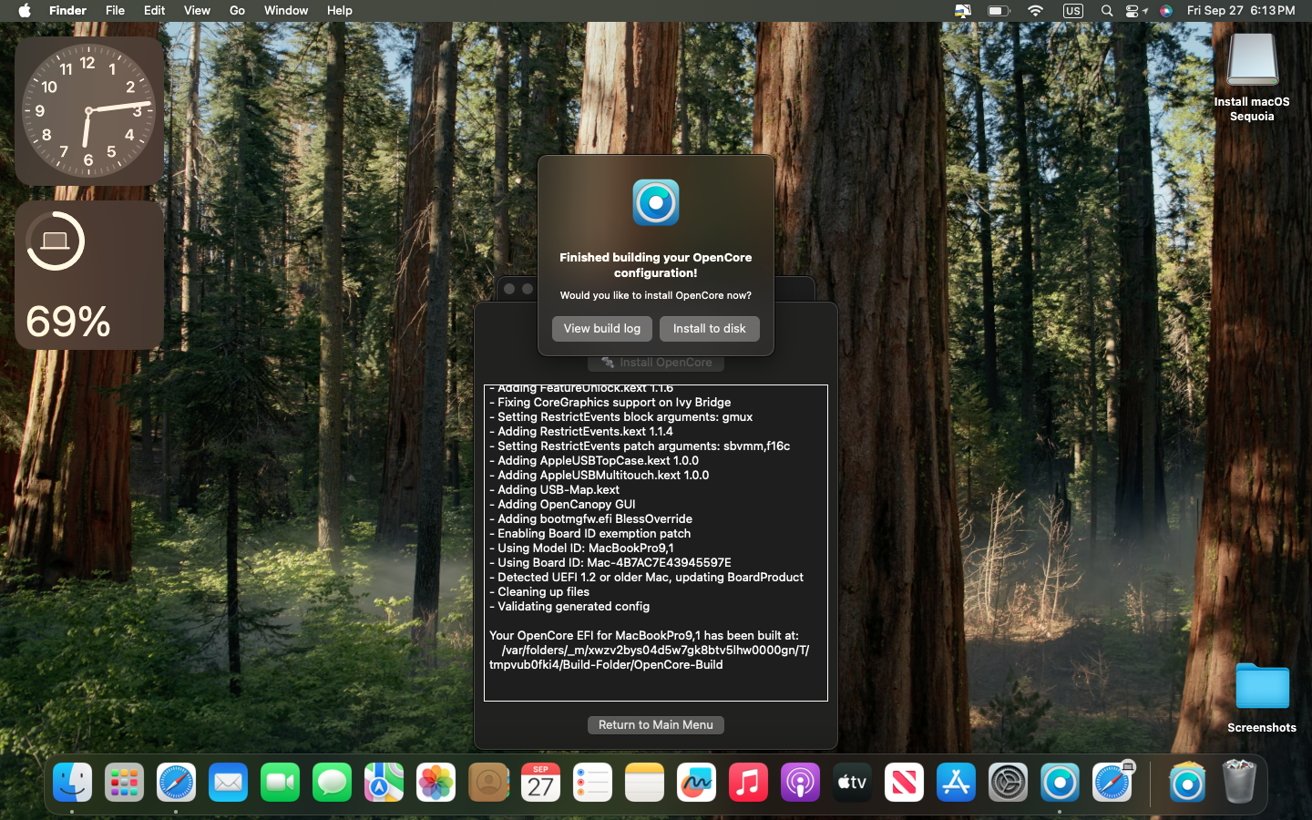
After building an OpenCore configuration, click on "Install to disk."
You will now have to select your external USB drive or solid state drive. Do not select your Mac's main drive, or you will not be able to boot into the installer.
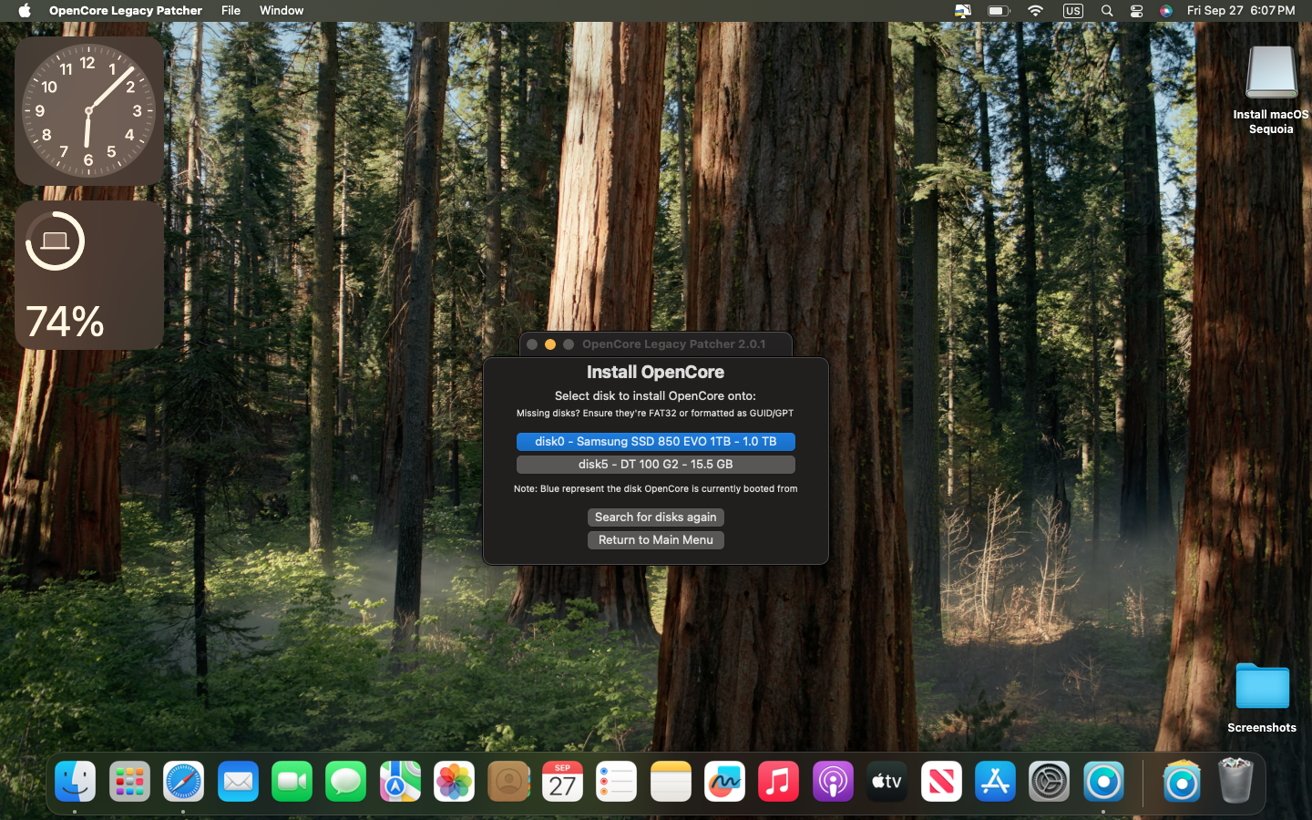
Select your external drive from the list.
Then select the EFI of the external drive plugged into your Mac.
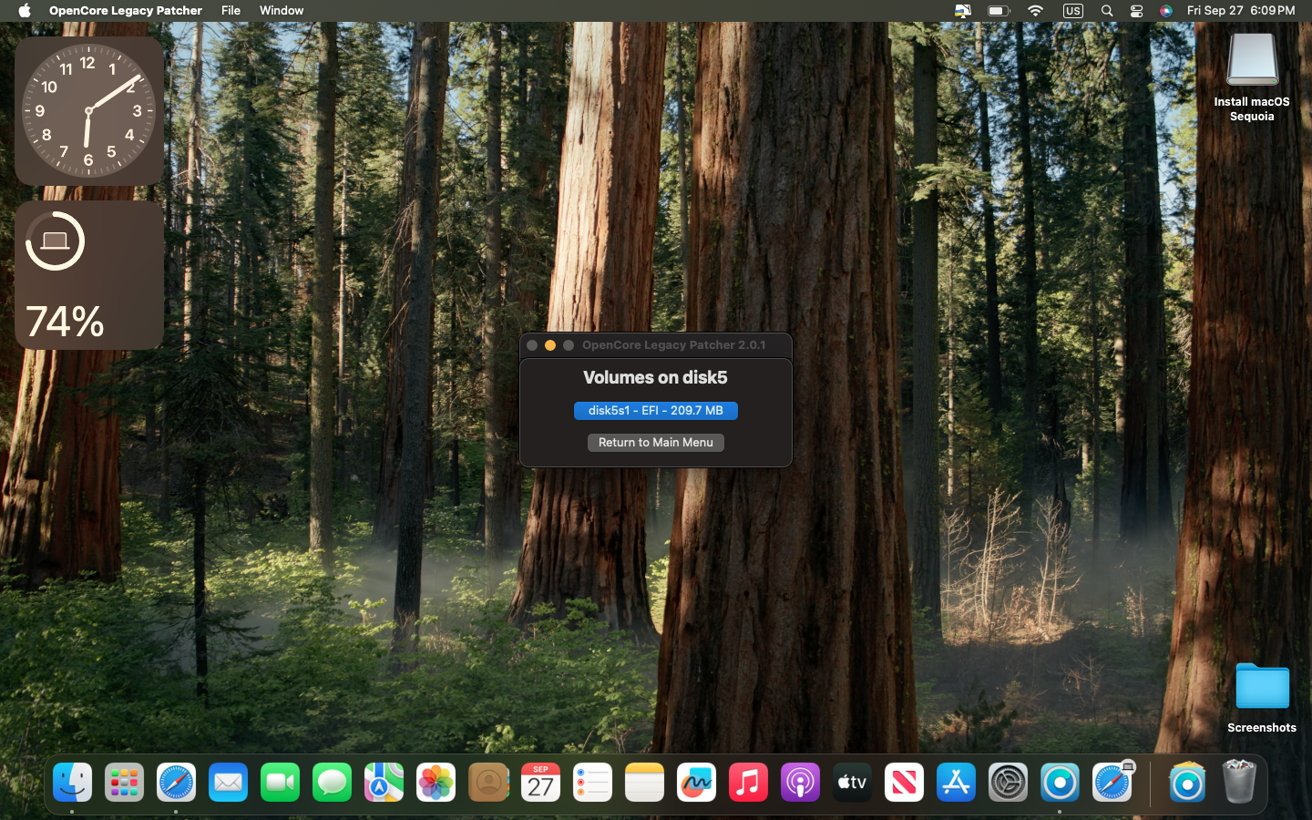
Select the EFI of the external drive.
Once you've created a bootable macOS Sequoia installer, with OpenCore installed on the external drive's EFI, you can click on "Reboot" to restart your Mac.
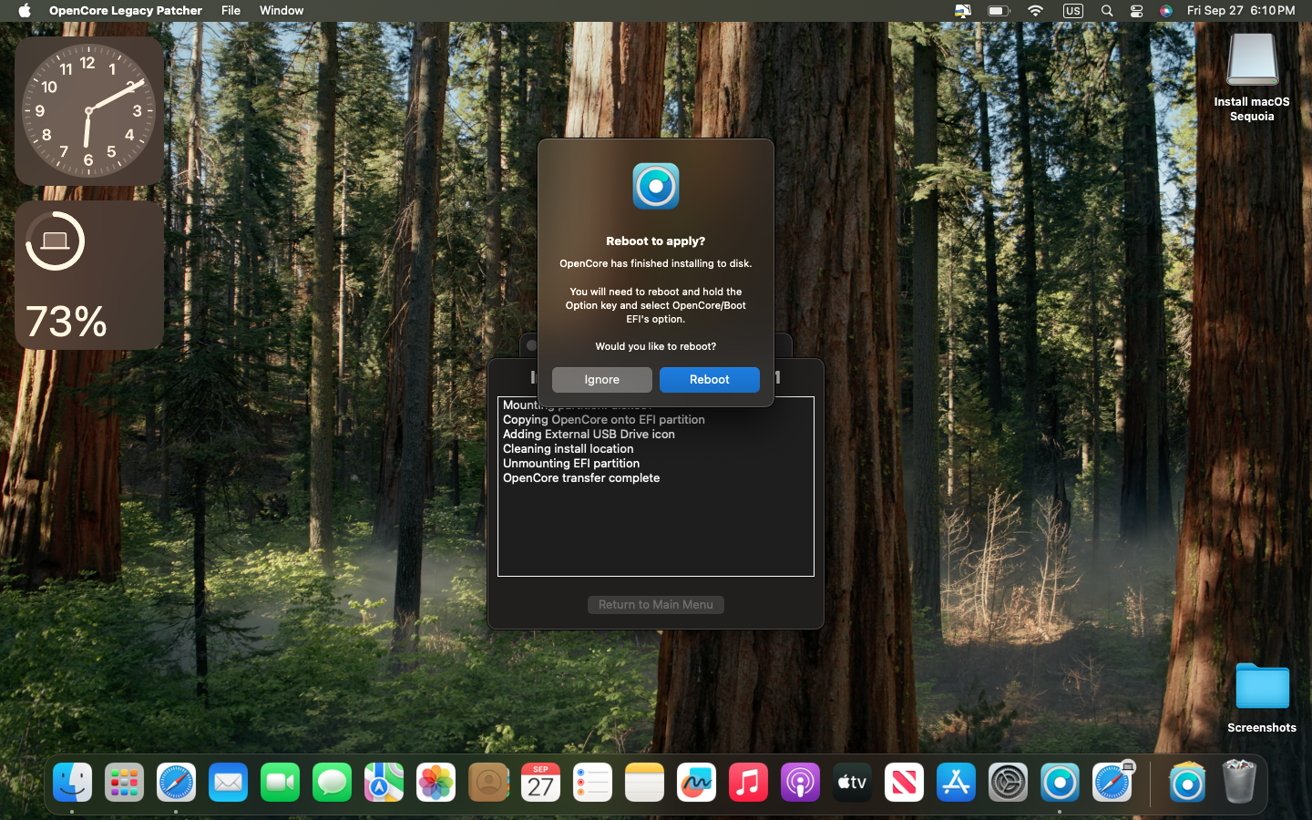
Once OpenCore is installed to the external drive, click on "Reboot."
Installing macOS Sequoia
As soon as the Mac powers on, press and hold the Option or Alt key on your keyboard. A blank screen with multiple large icons will pop up. Use the arrow keys to select the EFI Boot option and press the Return key.
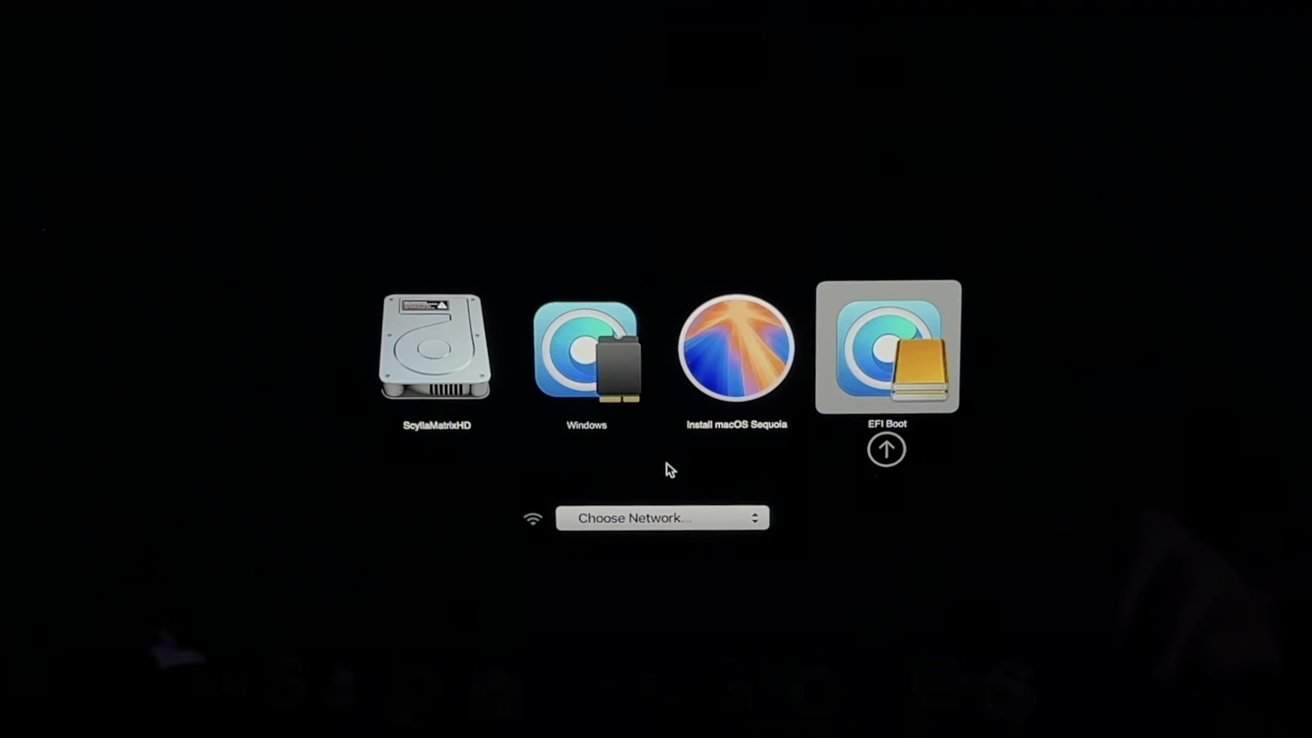
Select "EFI Boot" from the boot menu — Image Credit: Anson Alexander on YouTube
After doing so, you will see a second, similar screen. This time you'll need to use the arrow keys to select macOS Installer, and press the Return key.
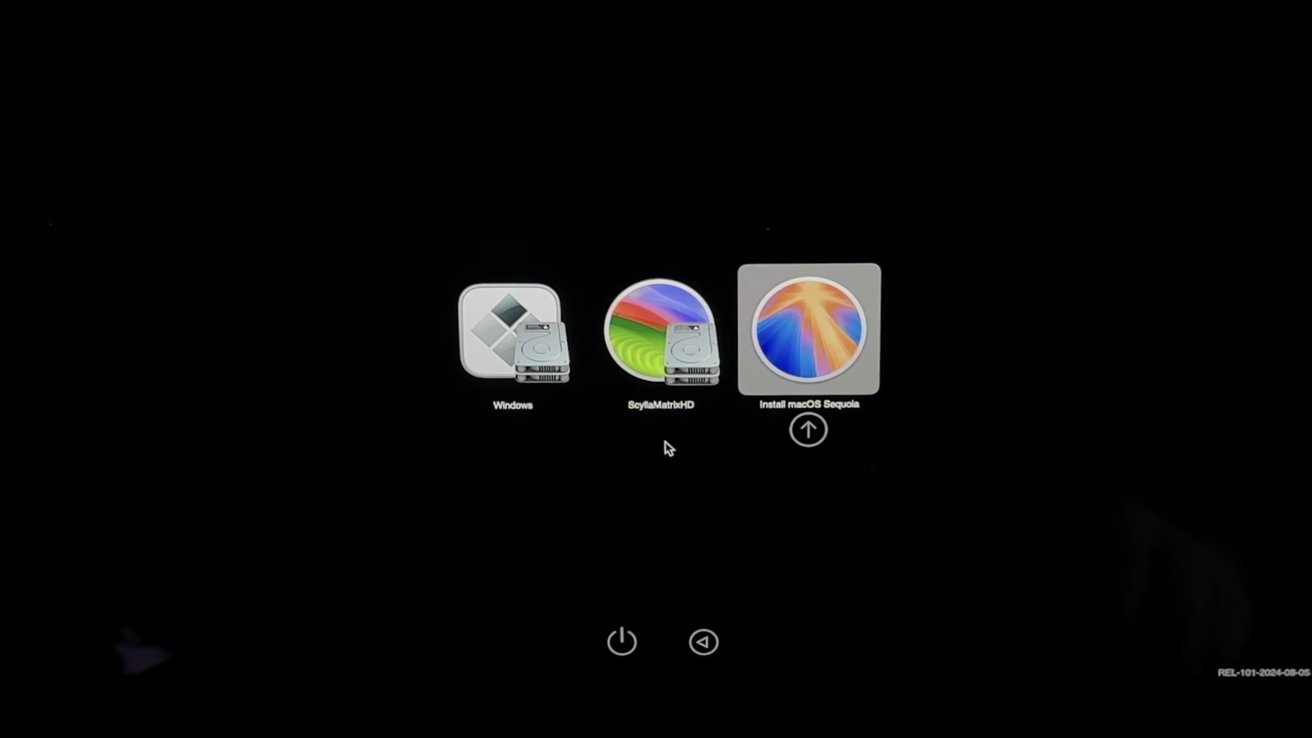
Select "macOS Installer" with the arrow keys, then press the "Return" key. Image credit: Anson Alexander on YouTube.
Your computer should now boot into the macOS Sequoia installer from the external drive plugged in earlier.
From here you can install macOS Sequoia as you would normally, by simply selecting Install macOS Sequoia, agreeing to the license agreement, and selecting your Mac's internal drive as the location to install macOS Sequoia.
Doing so will install macOS Sequoia while preserving the data, applications, and settings you may already have on your Mac. Alternatively, you can also erase your Mac's internal drive with Disk Utility, and then install a fresh copy of macOS Sequoia.
The macOS Sequoia installation and setup process
Once you have accepted the terms of Apple's license agreement and chosen your Mac's internal drive, the macOS Sequoia install process will begin.
During the installation, your Mac should reboot multiple times. Do not interact with the Mac while it is installing macOS or while it's rebooting. Wait until the installer has finished before going back to the computer.
If your Mac has built-in fans, as is the case with MacBook Pro models, you may hear the fans turn on. This is normal during the installation process and is no cause for alarm.
After the installation is complete, you'll be greeted with a setup screen. Here you'll need to enter your Apple Account information and configure macOS Settings.
If you have installed a fresh copy of macOS Sequoia onto a blank drive, the setup process will be longer, as it entails more steps.
What to do if your Mac is slow and you see a gray dock after installing macOS Seqouia
During the last phase of the macOS installation process, OpenCore Legacy Patcher automatically applies so-called "root patches."
These patches enable things such as Metal graphics acceleration and the keyboard backlight on certain models.
Sometimes, however, OpenCore Legacy Patcher will not install these root patches automatically. This means that your Mac could appear unreasonably slow, and experience graphical glitches along with a gray dock upon first using macOS Sequoia.
Luckily, there's an easy fix for this — you can install the missing root patches manually, through the OpenCore Legacy Patcher app.
Manually applying post-install root patches
Open the OCLP app and select Post-Install Root Patch. A post-install menu will pop up, informing you if any root patches are necessary.
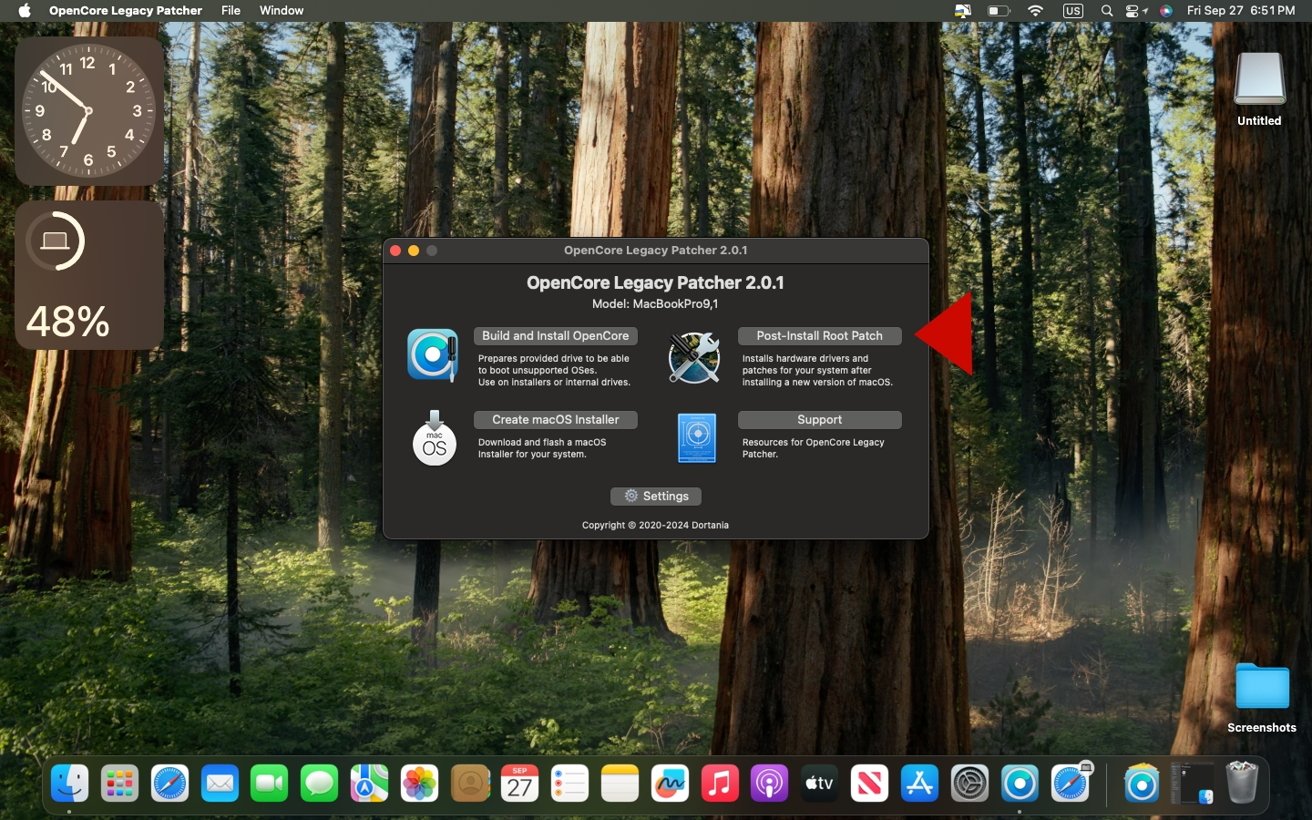
Select "Post-Install Root Patch" in the OpenCore Legacy Patcher app.
If the description says anything other than "All applicable patches already installed," click the Start Root Patching button.
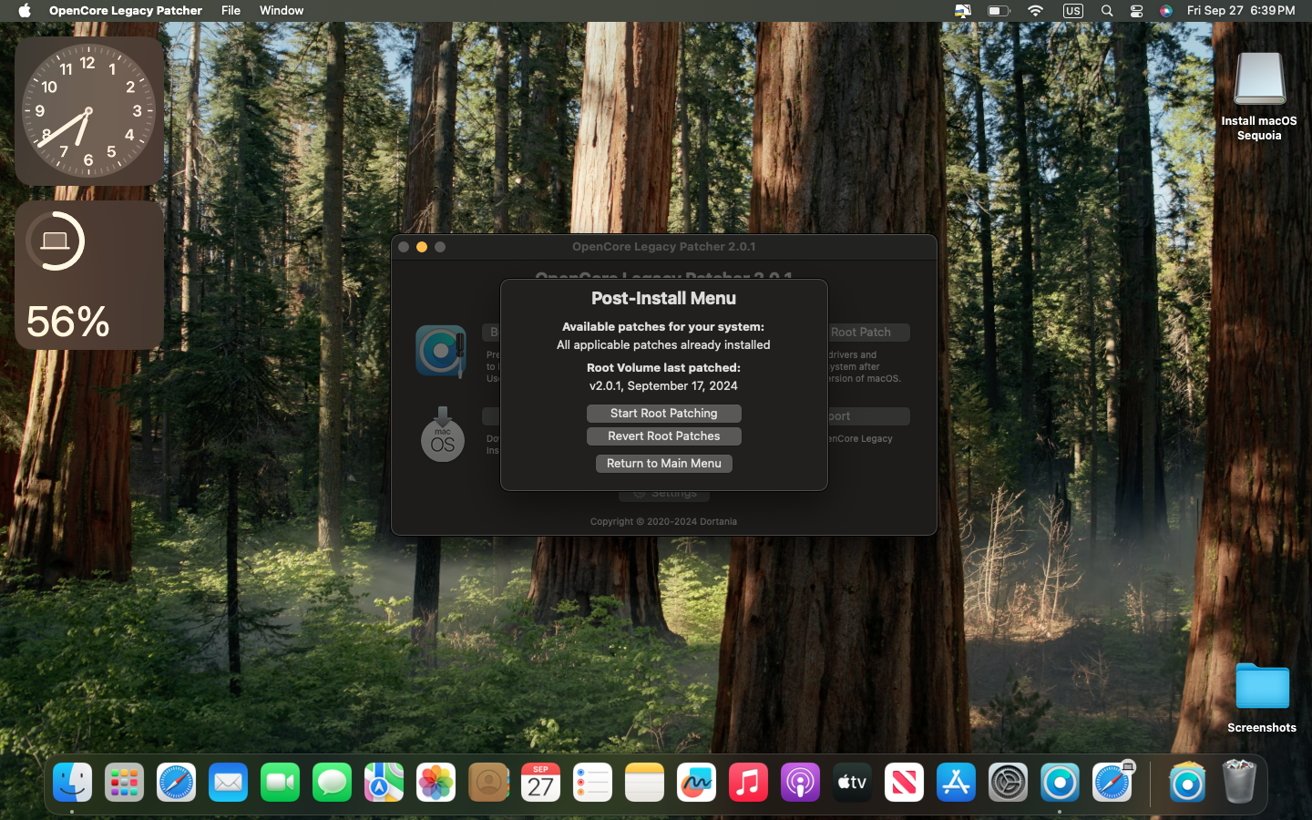
If you see anything other than "All applicable patches already installed," click on "Start Root Patching."
The OpenCore Legacy Patcher will identify your Mac model and apply the necessary root patches. Doing so will enable graphics acceleration and certain hardware components, depending on the model. In short, you'll no longer see a gray dock after applying the root patches.
Once the root patches have been installed, the OpenCore Legacy Patcher will ask if you want to reboot your Mac. Click Reboot. After this, you should not experience graphical issues anymore.
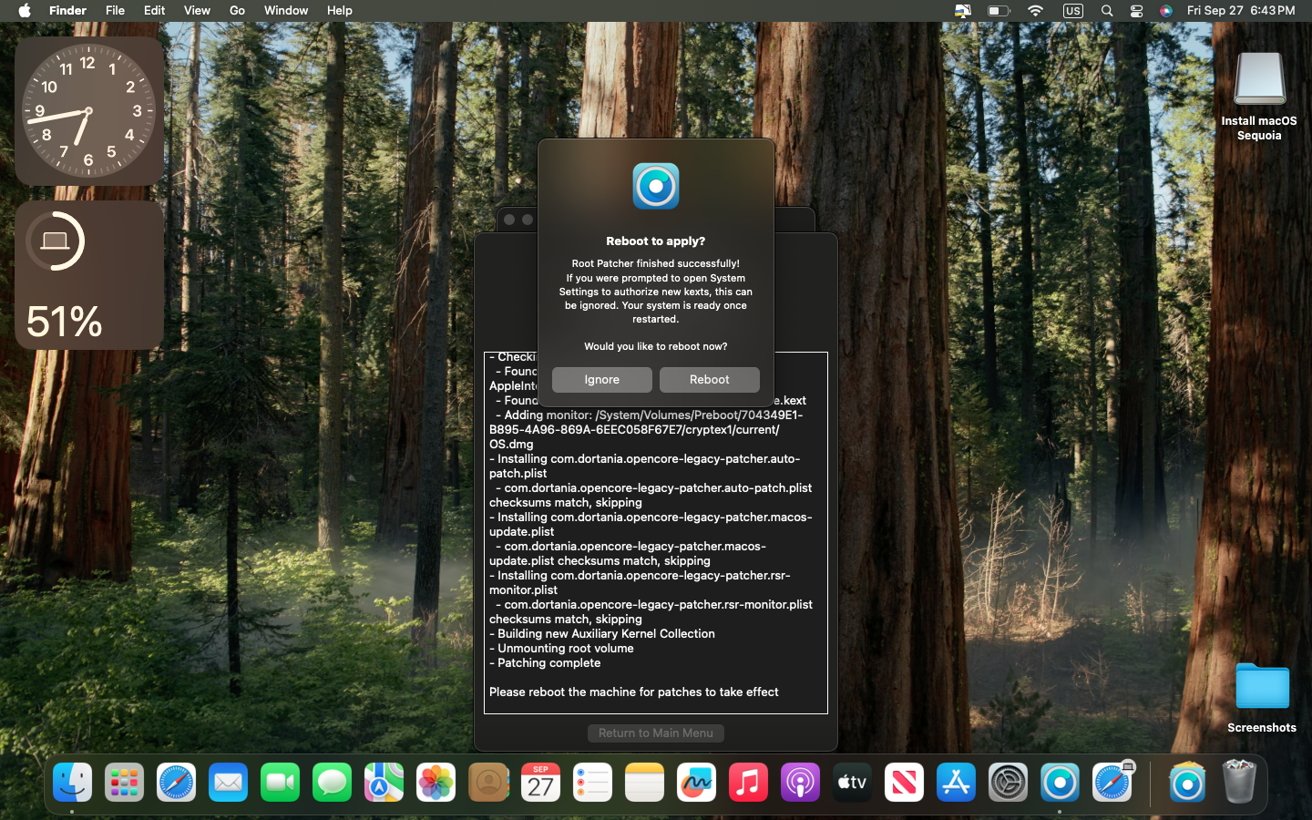
Once the root patches have been installed, click on "Reboot."
After you have applied the post-install root patches, you need to install OpenCore on your Mac's internal drive, so that your computer can boot without the external installer drive.
Installing the OpenCore bootloader on your Mac's internal drive
Currently, your Mac uses the OpenCore bootloader installed on the external drive, which was used to install macOS Sequoia. This means that the Mac cannot boot into its operating system unless the drive is connected.
To remove this requirement, you'll need to install OpenCore on the internal drive of your Mac, the same drive where macOS Sequoia was just installed.
The OpenCore Legacy Patcher application will typically notify you if you're using OpenCore from an external drive, and offer to install OpenCore on your Mac's internal storage. Click on OK if you see a prompt about this.
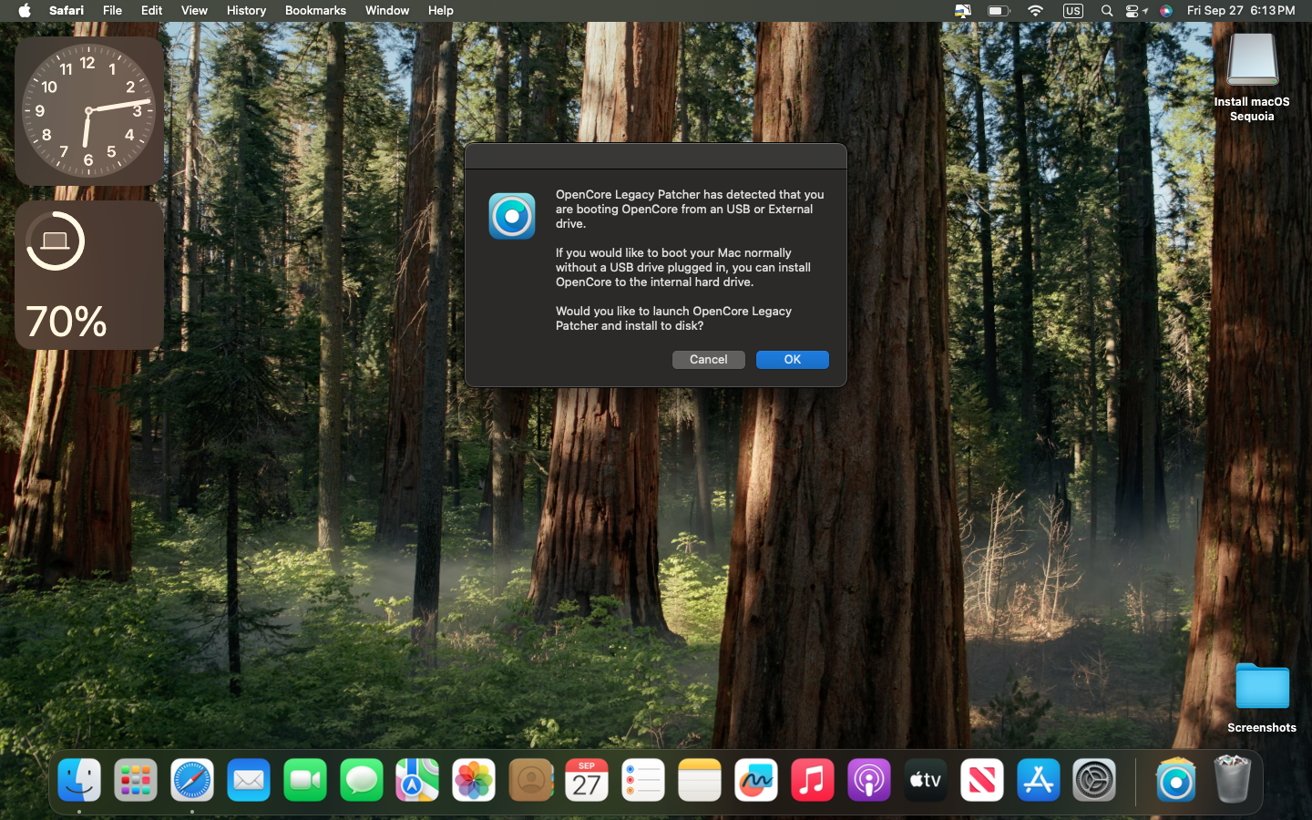
The OpenCore Legacy Patcher app will notify you if your Mac is booting OpenCore from an external drive. Click "OK" to install OpenCore on your main drive.
This will start building an OpenCore configuration for your Mac. If the previous prompt doesn't appear, you can build OpenCore manually. To do this, open the OpenCore Legacy Patcher app and select Build and install OpenCore.
After an OpenCore configuration has been created, click on Install to disk.
After building an OpenCore configuration, click on "Install to disk."
The patcher will ask you to select a local disk — choose your Mac's internal drive and not the external USB or solid-state drive.

Select your Mac's internal storage drive, and not the external install drive.
After this, you'll need to select the internal drive's EFI, and install OpenCore onto it. Once this is done, eject and unplug the external drive, and reboot your Mac as instructed by the OpenCore Legacy Patcher app.
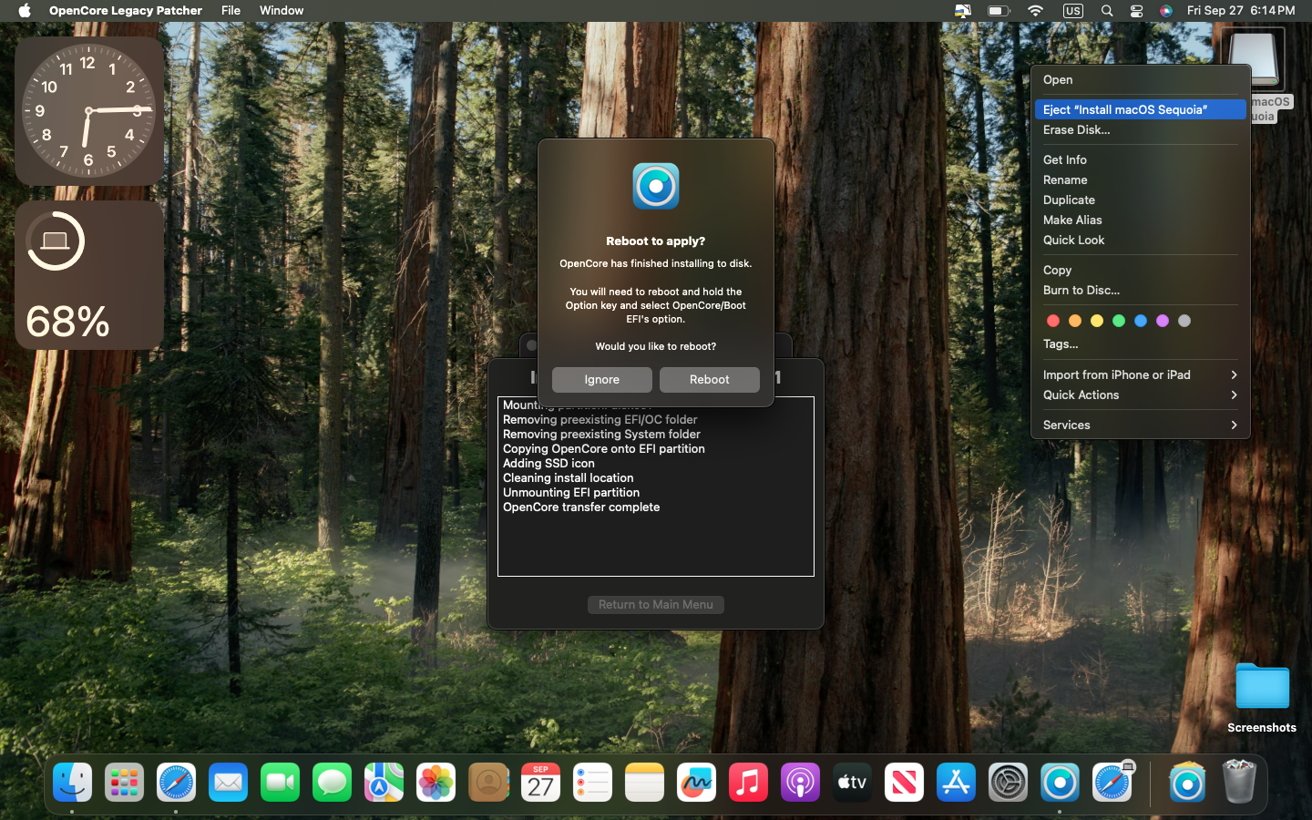
Once OpenCore has been installed on the main drive, eject your external drive and click "Reboot."
As soon as your Mac turns on, press and hold the Option or Alt key. Use the arrow keys to select the EFI Boot icon, and press the Return key. Your Mac should now be able to boot into macOS Sequoia directly from the internal drive.
Disabling automatic downloads for software updates
Once you have successfully installed macOS Sequoia, and once your Mac can boot into the operating system without any issues, you're ready to move to the next step.
Open System Settings, navigate to General > Software Update.
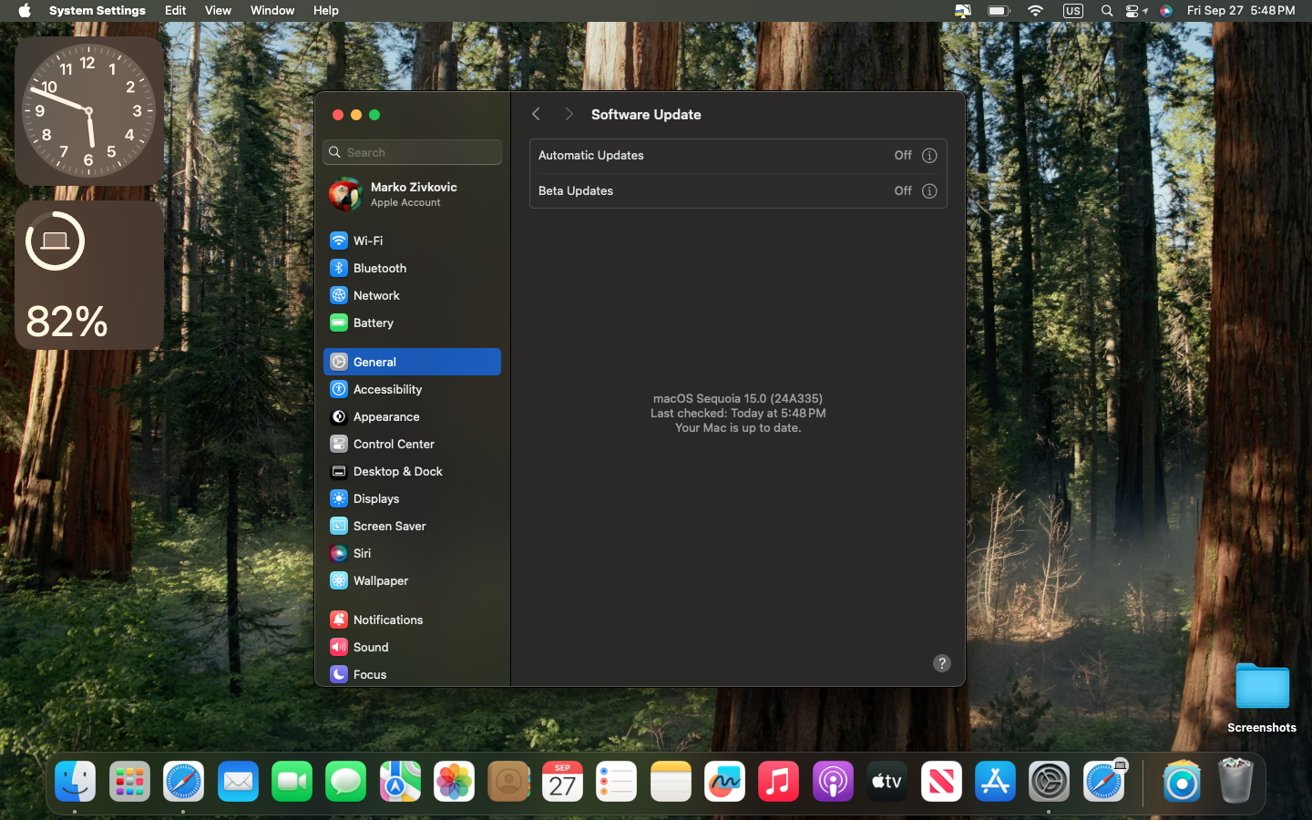
Navigate to System Settings > Software Update > Automatic Updates and disable all automatic updates.
After this, click the i icon next to the Automatic Updates setting. Make sure that all of the options listed here are disabled.
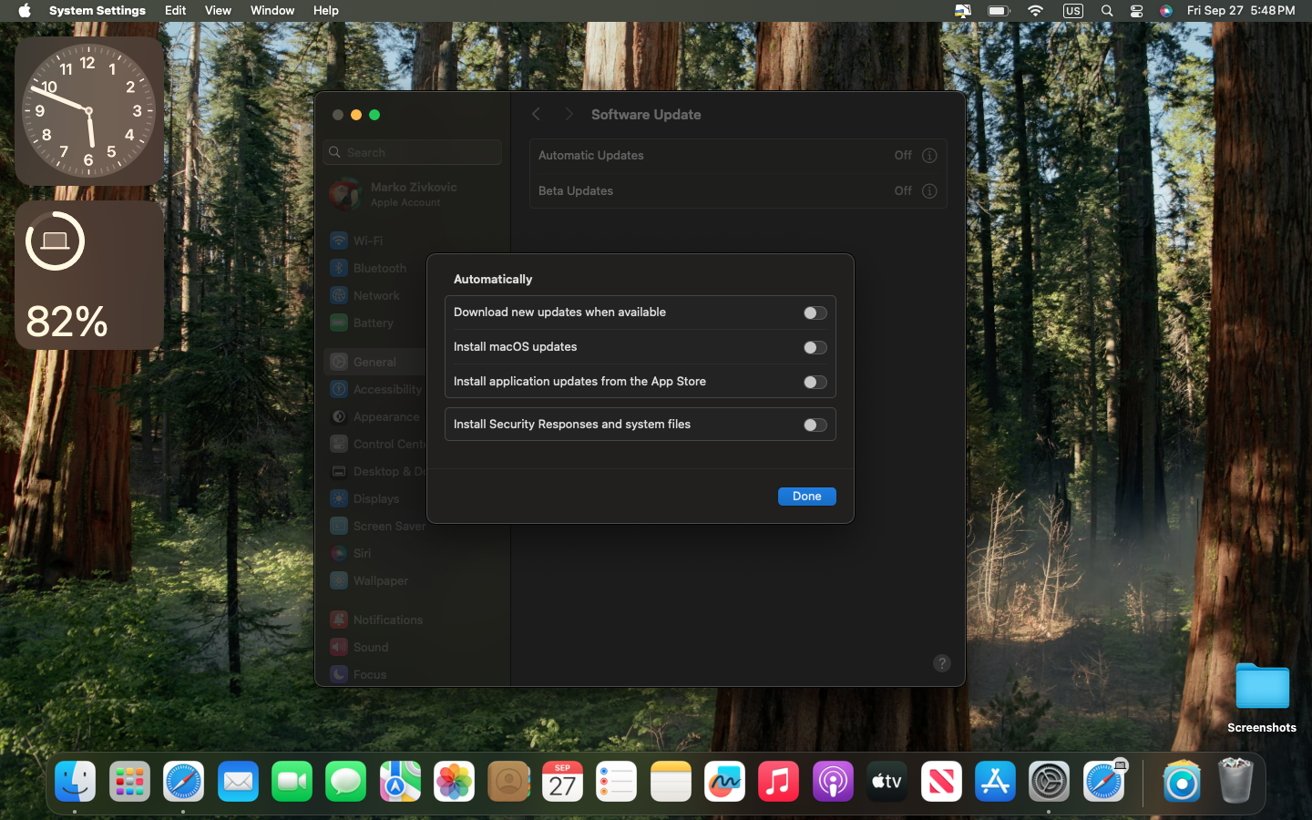
Turn off all of the settings pictured here.
Disabling these automatic downloads significantly reduces the chances of experiencing issues with your operating system in the future. Your Mac will not be able to, for instance, install a new operating system update that is incompatible with the version of OpenCore Legacy Patcher currently installed.
Performance and overall usability of macOS Sequoia on unsupported hardware
You should now have a Mac that runs macOS Sequoia without any major issues. It's worth pointing out, though, that many of the machines supported by OpenCore Legacy Patcher are over ten years old.
The use of older hardware means that performance obviously won't be up to par with officially supported machines, such as those with an M1 or newer chip.
You will still be able to use the latest versions of most applications, but you may find that your Mac is slow to open them, or that multi-tasking can become difficult. You may also hear your Mac's fans running more often, especially right after the operating system installation.
Nonetheless, performance is still acceptable, at least on Metal-capable machines such as the 2012 MacBook Pro we used for testing. While perhaps not ideal, macOS Sequoia is perfectly usable on this machine. Performance will obviously still vary depending on your Mac's specific hardware, and whether or not it's been upgraded.
It's also worth pointing out that unsupported machines don't get all the bells and whistles Apple announced for macOS Sequoia, as many of them are hardware-specific.
Apple Intelligence does not work on unsupported Macs, or Intel Macs
The main drawback of using an older Mac on macOS Sequoia is the lack of Apple Intelligence support. Intel-based Macs, even those officially supported by Apple, do not feature Apple Intelligence as they lack the necessary hardware.
-xl.jpg)
Apple Intelligence is not available on unsupported Macs or any Intel-based Macs.
Apple Intelligence is the name used for Apple's generative AI software, which lets users edit images and texts, and summarize emails or conversations with the help of artificial intelligence.
Macs with an Intel processor don't have a neural processing unit or NPU, which is needed for Apple Intelligence. Only Mac computers with an M1 or newer Apple Silicon chip feature an NPU.
As a result, users of older, Intel-based Mac computers won't be able to experience any of Apple's latest AI features. Many Apple Intelligence were previewed at WWDC in June, and are already available on Apple Silicon Macs.
iPhone Mirroring will not work on older Macs without a T2 security chip
macOS Sequoia includes an all-new "iPhone Mirroring" app, which lets you mirror the screen of your iPhone on your Mac. On officially supported Macs and iPhones, you can use this feature to easily drag and drop files between the two devices as well.
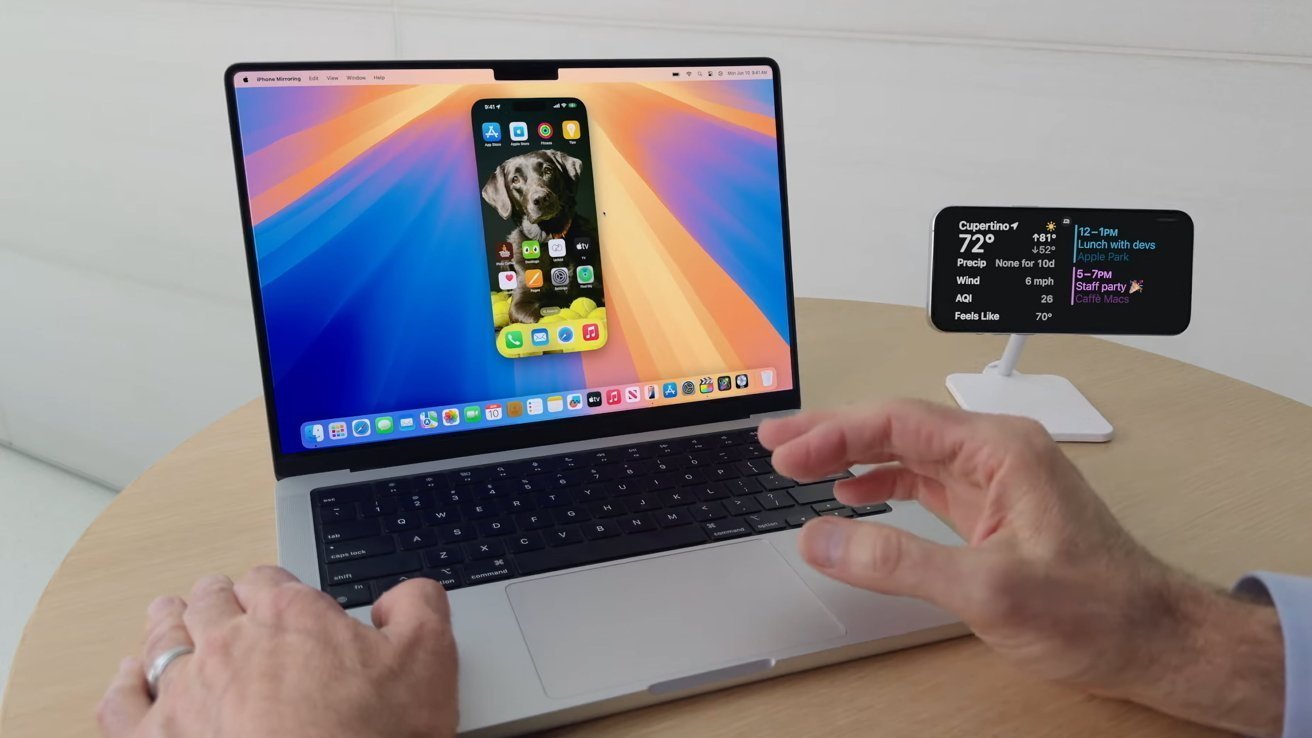
iPhone Mirroring requires T2 security chip attestation to work.
Apple's iPhone Mirroring application unfortunately has a hardware-based requirement. For the feature to work, an Intel Mac needs to have a T2 security chip. Many older Mac models supported by OpenCore Legacy Patcher do not feature a T2 security chip, making iPhone Mirroring impossible on these computers.
2018 and 2019 MacBook Air models feature the T2 security chip required for iPhone Mirroring, but macOS Sequoia cannot be installed on these machines with OpenCore Legacy Patcher. Apple does not offer macOS Sequoia support for these computers either.
Issues with Non-Metal Macs
Most Pre-2012 Macs lack a Metal-compatible graphics card. Simply put, Metal is a hardware-specific graphics acceleration framework that's used throughout macOS.
Macs with out a Metal-compatible GPU will experience some issues on macOS Sequoia.
OpenCore Legacy Patcher's developers have created root patches specifically for non-Metal Macs, meaning that users of older Mac computers will still be able to use macOS Sequoia without major problems.
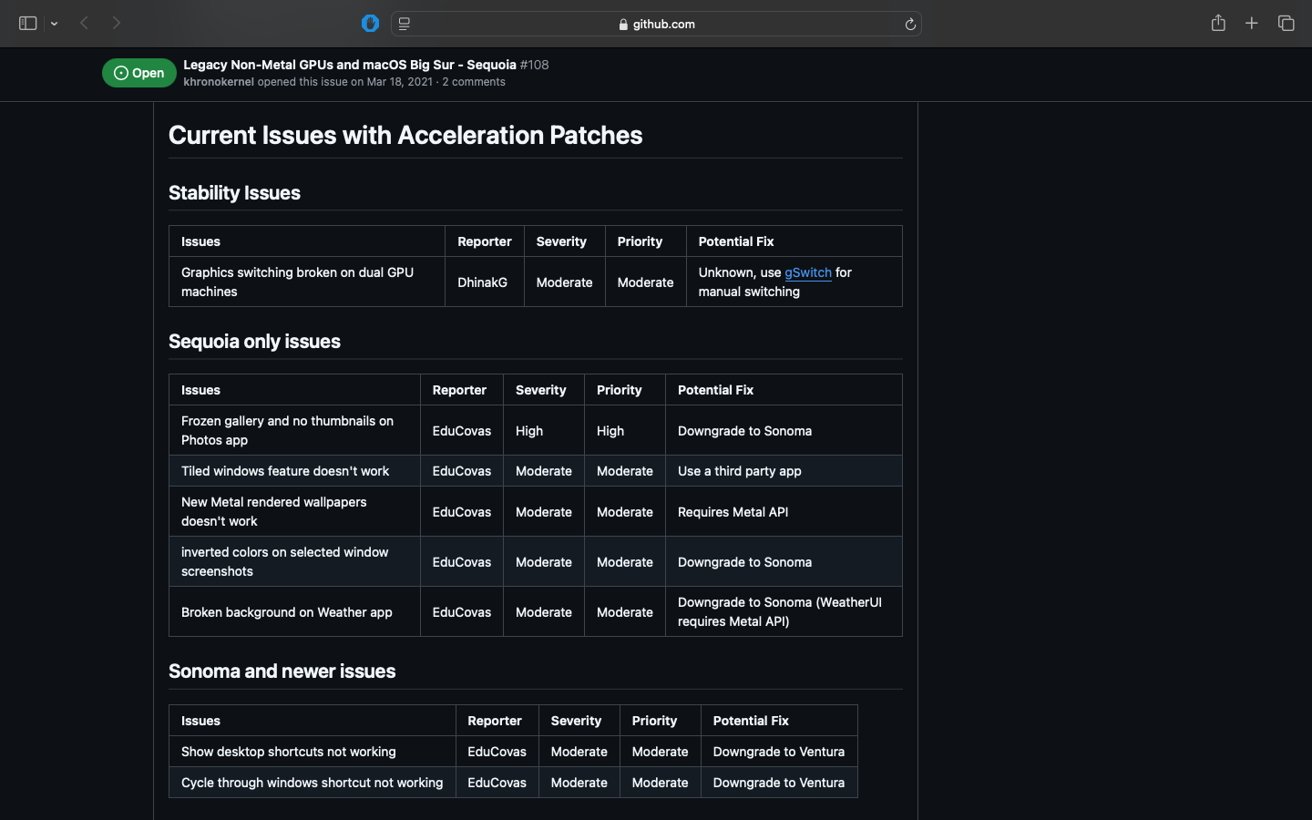
That being said, though, non-Metal Macs can still experience problems with features such as Tiled windows and Stage Manager. Apps such as Maps, Photos, and Weather also do not work properly on non-Metal machines running macOS Sequoia. Macs without a Metal-capable GPU may also experience issues with the new wallpapers found in macOS Sequoia.
The official OpenCore Legacy Patcher GitHub page has a list of known problems affecting Macs without a Metal-compatible GPU.
The new features you get with macOS Sequoia and the OpenCore Legacy Patcher
While Apple Intelligence and iPhone Mirroring won't work on unsupported Macs, you'll still get to enjoy many of the other enhancements found within macOS Sequoia.
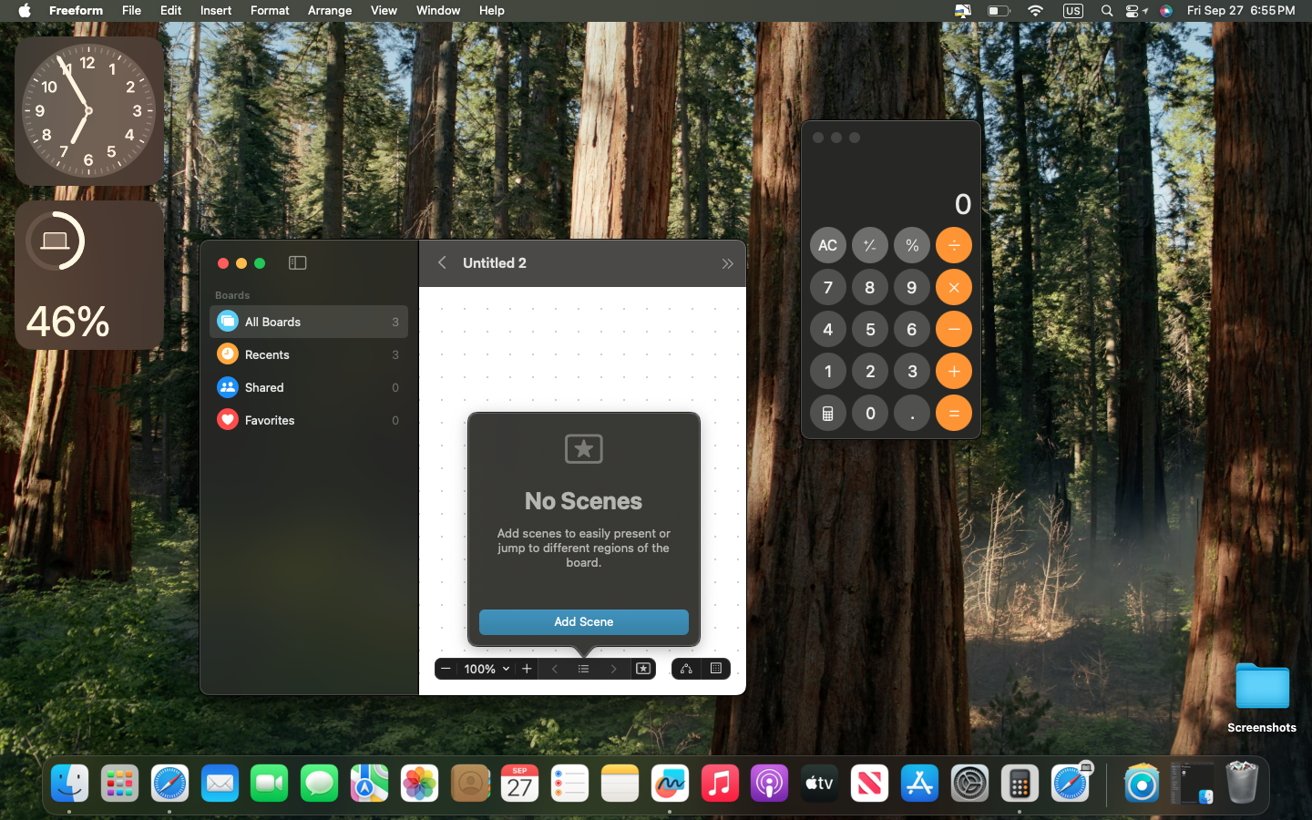
On unsupported Macs running macOS Sequoia, you can use the redesigned Calculator and try out the new Scenes feature in Freeform.
This means that unsupported machines can still access the redesigned Calculator app with Math Notes, or the updated Calendar app which lets you schedule reminders.
In macOS Sequoia, Freeform has an entirely new Scenes feature, which lets you select certain parts of a board and navigate easily between them.
The redesigned Safari quick menu is also available on unsupported Macs, as is the Distraction Control feature, which lets you hide unwanted elements from a webpage.
OpenCore Legacy Patcher can also enable a variety of other macOS features, depending on your Mac's hardware. This includes features such as AirDrop, AirPlay to Mac, Apple Watch Unlock, Night Shift, Sidecar, and Universal Control.
Additional resources for installing unsupported macOS
While this guide presents a basic overview of the installation process, it is by no means all-encompassing. This is why we recommend looking through the official GitHub page for Dortania's OpenCore Legacy Patcher.
Coming from the developers themselves, the page has a detailed guide, along with numerous useful resources. It also details the invididual issues that affect specific unsupported Mac models, and lists potential workarounds for some of them.
For those who prefer a guide in video form, Mr. Macintosh has a dedicated video on installing macOS Sequoia and OpenCore Legacy Patcher on unsupported Macs. Anson Alexander also has a similar video on his channel.
While there are plenty of useful resources and videos detailing the installation process, there are other factors that need to be taken into account. Before upgrading, you'll want to consider everything you'd get with macOS Sequoia, and how it would impact your Mac in the long run.
Is macOS Sequoia worth running on unsupported Macs?
By installing macOS Sequoia on an unsupported Mac, you're effectively extending its lifespan well into the near future. Over time, an increasing number of third-party applications will likely require macOS Sequoia to run.
With macOS Sequoia, you get an updated version of Safari with Distraction Control.
Updating to macOS Sequoia will also give you a better web browsing experience, given that you'll be using the latest version of Safari currently available. Outdated web browsers are a serious hindrance for older Mac computers, as pages will often fail to load properly or at all.
You'll also get to experience and take advantage of the many subtle improvements found within macOS Sequoia, such as Distraction Control in Safari or the upgraded Calculator app with an improved unit conversion system.
While it's not possible to get Apple Intelligence features on a decade-old computer, installing macOS Sequoia on unsupported hardware is still a reasonable option for many users. Anyone who wants to get the absolute most out of their Mac should at least consider using OpenCore Legacy Patcher, as the features it enables make the software worthwhile.